Thursday, December 8, 2016

handling blank iputs in a shell script.


Here is simple script to handle blank inputs in your interactive shell scripts.

#!bin/sh
while :
echo "enter value for a:";read -r a;  do
         if [ -z "${a}" ]; then
         echo "That was empty, do it again!"

        else ## echo "Checking now..."
                echo "value passed is :$a"
                echo "valid input received."
                break
    fi
done

echo "We are out of loop:"

Sample Output :

[Linux01] $ . Test_input11.sh
enter value for a:

That was empty, do it again!
enter value for a:

That was empty, do it again!
enter value for a:

That was empty, do it again!
enter value for a:
1
value passed is :1
valid input received.
We are out of loop:

Error handling in shell script


Error handling in shell script while receiving user input

 
This is help full sample script that can help in error handling.In situations where I give user to choose 1 or 2 but lets say in rush/hurry user inputs a diff value. This script can handle those situations. In below script the user will be in loop until he passes a expected value (1 or 2 in this case). This script can be altered as per your requirement.

On how to handle just blank inputs use this link


-- Script starts here

#!bin/sh
## Created by     :    Arvind Toorpu
## This script will prompt user for input until the user passes the expected input.
##
while :
echo "enter value for a:";read -r a;  do
         if [ -z "${a}" ]; then
         echo "That was empty, do it again!"

        elif [ "${a}" -eq "1" ]  || [ "${a}" -eq "2" ]; then
                ## echo "Checking now..."
                echo "value passed is :$a"
                echo "Condition success"
         break

        elif [ "${a}" -ge "3" ]
        then
        echo "Select either option :1 or :2 "
    fi
##break
done


Sample output :

atoorpu@Linux01:[~/TEST_DIR/scripts] $ . Test_input2.sh
enter value for a:

That was empty, do it again!
enter value for a:

That was empty, do it again!
enter value for a:
4
Select either option :1 or :2
enter value for a:
5
Select either option :1 or :2
enter value for a:
6
Select either option :1 or :2
enter value for a:
6
Select either option :1 or :2
enter value for a:
7
Select either option :1 or :2
enter value for a:
2
value passed is :2
Condition success
do your thing here with read value 2

Monday, September 26, 2016

service enable slapd enable: unrecognized service


Problem: 

[root@linuxOS cn=config]# service start slapd
start: unrecognized service


[root@linuxOS cn=config]# start slapd
start: Unknown job: slapd


[root@linuxOS cn=config]# start slapd
start: Unknown job: slapd


Solution:
 Use the start command after ServiceName

Syntax :
# service ServiceName Start

[root@linuxOS app]# service slapd start

Checking configuration files for slapd:                    [WARNING]
57e427f1 ldif_read_file: checksum error on "/etc/openldap/slapd.d/cn=config/olcDatabase={1}monitor.ldif"
57e427f1 ldif_read_file: checksum error on "/etc/openldap/slapd.d/cn=config/olcDatabase={2}bdb.ldif"
config file testing succeeded
Starting slapd:                                            [  OK  ]

Friday, September 2, 2016

Print two file in NIX machines


To print two files side by side we can use pr command. This can be used on Unix\Linux provided that package is installed.

Print two files side by side :


atoorpu@Linux01:[~/tmp] $ pr -m -t t1.txt t2.txt
abcd                                abcd2
efgh                                efgh
ijkl                                  ijkl12
mnop                              mnop


 ADDING SOME SPACE TO T1 IT LOOKS LIKE THIS:

atoorpu@Linux01:[~/tmp] $ pr -m -t t1.txt t2.txt
AB CD                               abcd2
EF GH                               efgh
ij kl
mnop                                ijkl12
                                    mnop
                                   
reference for pr cmd     : http://linux.about.com/library/cmd/blcmdl1_pr.htm

compare two files in Linux\Unix


We can use the diff cmd to compare files on Linux\Unix machines.


atoorpu@Linux01:[~/tmp] $ cat t1.txt
abcd
efgh
ijkl
mnop

atoorpu@Linux01:[~/tmp] $ cat t2.txt
abcd2
efgh
ijkl12
mnop


atoorpu@Linux01:[~/tmp] $ diff -y t1.txt t2.txt
abcd                                                          | abcd2
efgh                                                            efgh
ijkl                                                          | ijkl12
mnop                                                            mnop


[option] -y     :    Use the side by side output format.


you can also set width to print columns using the -W, --width=NUM option:

atoorpu@Linux01:[~/tmp] $ diff -y -W 20 t1.txt t2.txt
abcd  | abcd2
efgh    efgh
ijkl  | ijkl1
mnop    mnop

To ignore the case sensitivity between two files use -i :

atoorpu@Linux01:[~/tmp] $ diff -y -i t1.txt t2.txt
ABCD                                                          | abcd2
EFGH                                                            efgh
ijkl                                                          |
                                                              > ijkl12
mnop                                                            mnop

To ignore white spaces between two files use --ignore-all-space :

ADDING SOME SPACE TO T1 IT LOOKS LIKE THIS:
atoorpu@Linux01:[~/tmp] $ pr -m -t t1.txt t2.txt
AB CD                               abcd2
EF GH                               efgh
ij kl
mnop                                ijkl12
                                    mnop


To compare two directories you can use :

atoorpu@Linux01:[~/tmp] $ diff -y /home/atoorpu/tmp/A /home/atoorpu/tmp/B
diff -y /home/atoorpu/tmp/A/t1.txt /home/atoorpu/tmp/B/t1.txt
AB CD                                                           AB CD
EF GH                                                           EF GH
ij kl                                                           ij kl
mnop                                                            mnop
Only in /home/atoorpu/tmp/A: t2.txt


reference for diff cmd     :  http://linux.about.com/library/cmd/blcmdl1_diff.htm

gpg encryption helpfull cmds and examples


to create a key:
gpg --gen-key
generally you can select the defaults.

to export a public key into file public.key:
gpg --export -a "User Name" > public.key
This will create a file called public.key with the ascii representation of the public key for User Name. This is a variation on:
gpg --export
which by itself is basically going to print out a bunch of crap to your screen. I recommend against doing this.
gpg --export -a "User Name"
prints out the public key for User Name to the command line, which is only semi-useful

to export a private key:
gpg --export-secret-key -a "User Name" > private.key
This will create a file called private.key with the ascii representation of the private key for User Name.
It's pretty much like exporting a public key, but you have to override some default protections. There's a note (*) at the bottom explaining why you may want to do this.

to import a public key:
gpg --import public.key
This adds the public key in the file "public.key" to your public key ring.

to import a private key:
NOTE: I've been informed that the manpage indicates that "this is an obsolete option and is not used anywhere." So this may no longer work.
gpg --allow-secret-key-import --import private.key
This adds the private key in the file "private.key" to your private key ring. There's a note (*) at the bottom explaining why you may want to do this.

to delete a public key (from your public key ring):
gpg --delete-key "User Name"
This removes the public key from your public key ring.
NOTE! If there is a private key on your private key ring associated with this public key, you will get an error! You must delete your private key for this key pair from your private key ring first.

to delete an private key (a key on your private key ring):
gpg --delete-secret-key "User Name"
This deletes the secret key from your secret key ring.

To list the keys in your public key ring:
gpg --list-keys

To list the keys in your secret key ring:

gpg --list-secret-keys


Generate a public_key on Screen:


[oracle@Linux03 ~]$ gpg --list-keys
/home/oracle/.gnupg/pubring.gpg
-------------------------------
pub   2048R/5C7C15D6 2016-09-02
uid                  Test1234 (Test gpg key) <Test1234@gmail.com>
sub   2048R/AAEC411C 2016-09-02

[oracle@Linux03 ~]$ gpg --export -a Test1234
-----BEGIN PGP PUBLIC KEY BLOCK-----
Version: GnuPG v2.0.14 (GNU/Linux)

mQENBFfJiSsBCAC3x8IIrIEcogQ18xh0JrQxmdoGhyX1LHe+NH6mbC5jo5u7wiga
4LKDF50h51ZKYAgHLlg7Xu7It/Mneb+NVvta+XRXb2rclbx0bHUF1faojOYnzcRr
ZauOYVV52Q5otIVq6Ra22mX5smkrCxKjD3DVTD0silmhJP734nlXUJjnrEw1Pxxy
A4xqJTaf6ZYtVd5JDdhDk8pxiGj6cUDUxpIGVFXZfJ7os0aS/P7wunrHVSEmN16V
NyPVzpTIq+wwiMNp53y92NevxbT9N4WaUkLDMHoIca/SZ0Mk7Gy+OLm0azByTsjj
Uq7i3DJ8K1k96O3CtwQc4PD4SWYjcazYkEuHABEBAAG0LFRlc3QxMjM0IChUZXN0
IGdwZyBrZXkpIDxUZXN0MTIzNEBnbWFpbC5jb20+iQE4BBMBAgAiBQJXyYkrAhsD
BgsJCAcDAgYVCAIJCgsEFgIDAQIeAQIXgAAKCRDUtOPFXHwV1uMzCAClYXfJn/2F
YBw6stUzeDftt4I5h0+m0L9u+/bmbL87wdQpP4EOZNNq+srNr8Usnlm1CN955Lw1
Gwoo9Q06CaunNwPOXlph3bbmzL/zDryGR9u5ONl7SRHql3xJ1mCQGAMH6KLHP8PE
5KFdtd5xUw7RX1iOs739LOj5Nt8XRpqdfesDFi2zrl8mzmlXj1EFOFMSGjqlFsDL
pMTSA1R0NfepApvx4BTT2OdgFTksulZxLinla9RKdKIXs5HRWaTNGE9/tRL9IAEJ
5o7ZKs93jh0OOErh28nCdFFzc+pAKfPkBBJoqf217EQmDfm2d+K7k7rU/LSnzErc
eU9Hpvu036UOuQENBFfJiSsBCAD1E6SGsvbSSxcRS3IQr1qOJQZCyt2qGnfgLDAs
8QgdIF4yAj1zlDxhDvuRsCwKQrDDtadk+iplDuiqPgqYg0zr6JqXbjTdthw0gaSp
6QGqSEXIyfcrqCcgjF8mVL1D2vaF3dhQjVZWuEcnxMXtHJNQOeajrjhlyh4+wWpc
2/l4qm8dyPcqVdvcK9R62vcddi0ql5wHYMEHDF4QtA3CAYUmMl9jrQENWwBHY8Y6
HW8QejAlw7+kFxC2ZghRCgGvJytyQ8rPzMOG9qjU9MYdcWqe2ULr2/0jwAY+pPrB
db7MEwsWZHvLdf7D4MI6aA7/Iwv3vTaAiaD2HCPAjtF69DL5ABEBAAGJAR8EGAEC
AAkFAlfJiSsCGwwACgkQ1LTjxVx8FdaeaQgArWSxoHOjNW1LWvqA60DGgYRH6O42
y6itbtkyUHPiqdGjghFzcAnW3eZqj+oqGK3dayArtKVjQZUA2Nw3dlGXjNnfddAB
h4ZkeM2pnn/v9KwjILDVvPb+YavV/tv3Tr4zqi7s0ahSr9w2TvgoaVE6pYJNkWJT
Wy78P00cUBEUskSMc5twiYw8RKNsrDlacHt0czt5kCZ74Wst4+8bj9C2VLZm6b0B
qEGzXo4nZdnxIvAiHiE7vhmoygAU/tcS1sqV9KQj/thWdDD5+2HL4c0ecUsakoHE
81n91zRR8fesLdOKQPQfDmiwBMGJH+AdqwF+NUboIqT/WlwlSq45ompqqw==
=aoR+
-----END PGP PUBLIC KEY BLOCK-----


-----------------        ----------------        -----------------------------
    We can also generate the publickey and direct it to OuputFile:
-----------------        ----------------        -----------------------------


 Just use this cmd :

 [oracle@Linux03 ~]$ ls -ll Test1234_pubkey*
ls: cannot access Test1234_pubkey*: No such file or directory
[oracle@Linux03 ~]$ gpg -o Test1234_pubkey.key --export -a Test1234
[oracle@Linux03 ~]$ ls -ll Test1234_pubkey*
-rw-rw-r--. 1 oracle oracle 1735 Sep  2 09:18 Test1234_pubkey.key
[oracle@Linux03 ~]$ gpg --export -a Test1234
-----BEGIN PGP PUBLIC KEY BLOCK-----
Version: GnuPG v2.0.14 (GNU/Linux)

mQENBFfJiSsBCAC3x8IIrIEcogQ18xh0JrQxmdoGhyX1LHe+NH6mbC5jo5u7wiga
4LKDF50h51ZKYAgHLlg7Xu7It/Mneb+NVvta+XRXb2rclbx0bHUF1faojOYnzcRr
ZauOYVV52Q5otIVq6Ra22mX5smkrCxKjD3DVTD0silmhJP734nlXUJjnrEw1Pxxy
A4xqJTaf6ZYtVd5JDdhDk8pxiGj6cUDUxpIGVFXZfJ7os0aS/P7wunrHVSEmN16V
NyPVzpTIq+wwiMNp53y92NevxbT9N4WaUkLDMHoIca/SZ0Mk7Gy+OLm0azByTsjj
Uq7i3DJ8K1k96O3CtwQc4PD4SWYjcazYkEuHABEBAAG0LFRlc3QxMjM0IChUZXN0
IGdwZyBrZXkpIDxUZXN0MTIzNEBnbWFpbC5jb20+iQE4BBMBAgAiBQJXyYkrAhsD
BgsJCAcDAgYVCAIJCgsEFgIDAQIeAQIXgAAKCRDUtOPFXHwV1uMzCAClYXfJn/2F
YBw6stUzeDftt4I5h0+m0L9u+/bmbL87wdQpP4EOZNNq+srNr8Usnlm1CN955Lw1
Gwoo9Q06CaunNwPOXlph3bbmzL/zDryGR9u5ONl7SRHql3xJ1mCQGAMH6KLHP8PE
5KFdtd5xUw7RX1iOs739LOj5Nt8XRpqdfesDFi2zrl8mzmlXj1EFOFMSGjqlFsDL
pMTSA1R0NfepApvx4BTT2OdgFTksulZxLinla9RKdKIXs5HRWaTNGE9/tRL9IAEJ
5o7ZKs93jh0OOErh28nCdFFzc+pAKfPkBBJoqf217EQmDfm2d+K7k7rU/LSnzErc
eU9Hpvu036UOuQENBFfJiSsBCAD1E6SGsvbSSxcRS3IQr1qOJQZCyt2qGnfgLDAs
8QgdIF4yAj1zlDxhDvuRsCwKQrDDtadk+iplDuiqPgqYg0zr6JqXbjTdthw0gaSp
6QGqSEXIyfcrqCcgjF8mVL1D2vaF3dhQjVZWuEcnxMXtHJNQOeajrjhlyh4+wWpc
2/l4qm8dyPcqVdvcK9R62vcddi0ql5wHYMEHDF4QtA3CAYUmMl9jrQENWwBHY8Y6
HW8QejAlw7+kFxC2ZghRCgGvJytyQ8rPzMOG9qjU9MYdcWqe2ULr2/0jwAY+pPrB
db7MEwsWZHvLdf7D4MI6aA7/Iwv3vTaAiaD2HCPAjtF69DL5ABEBAAGJAR8EGAEC
AAkFAlfJiSsCGwwACgkQ1LTjxVx8FdaeaQgArWSxoHOjNW1LWvqA60DGgYRH6O42
y6itbtkyUHPiqdGjghFzcAnW3eZqj+oqGK3dayArtKVjQZUA2Nw3dlGXjNnfddAB
h4ZkeM2pnn/v9KwjILDVvPb+YavV/tv3Tr4zqi7s0ahSr9w2TvgoaVE6pYJNkWJT
Wy78P00cUBEUskSMc5twiYw8RKNsrDlacHt0czt5kCZ74Wst4+8bj9C2VLZm6b0B
qEGzXo4nZdnxIvAiHiE7vhmoygAU/tcS1sqV9KQj/thWdDD5+2HL4c0ecUsakoHE
81n91zRR8fesLdOKQPQfDmiwBMGJH+AdqwF+NUboIqT/WlwlSq45ompqqw==
=aoR+
-----END PGP PUBLIC KEY BLOCK-----


Reference :

http://irtfweb.ifa.hawaii.edu/~lockhart/gpg/gpg-cs.html

People use a key server to store their keys. That can be used as a vallet. One such example is  https://pgp.mit.edu/

deleting gpg key from store

[oracle@Linux03 ~]$ gpg --list-keys
/home/oracle/.gnupg/pubring.gpg
-------------------------------
pub   2048R/17DC5B7A 2016-09-02
uid                  arvind (arvind gpg test) <arvind@gmail.com>
sub   2048R/5C9DA3C6 2016-09-02


[oracle@Linux03 ~]$ gpg --delete-keys arvind
gpg (GnuPG) 2.0.14; Copyright (C) 2009 Free Software Foundation, Inc.
This is free software: you are free to change and redistribute it.
There is NO WARRANTY, to the extent permitted by law.

gpg: there is a secret key for public key "arvind"!
gpg: use option "--delete-secret-keys" to delete it first.
[oracle@Linux03 ~]$ gpg --delete-secret-keys arvind
gpg (GnuPG) 2.0.14; Copyright (C) 2009 Free Software Foundation, Inc.
This is free software: you are free to change and redistribute it.
There is NO WARRANTY, to the extent permitted by law.


sec  2048R/17DC5B7A 2016-09-02 arvind (arvind gpg test) <arvind@gmail.com>

Delete this key from the keyring? (y/N) y
This is a secret key! - really delete? (y/N) y
[oracle@Linux03 ~]$ gpg --list-keys
/home/oracle/.gnupg/pubring.gpg
-------------------------------
pub   2048R/17DC5B7A 2016-09-02
uid                  arvind (arvind gpg test) <arvind@gmail.com>
sub   2048R/5C9DA3C6 2016-09-02

[oracle@Linux03 ~]$ gpg --delete-keys arvind
gpg (GnuPG) 2.0.14; Copyright (C) 2009 Free Software Foundation, Inc.
This is free software: you are free to change and redistribute it.
There is NO WARRANTY, to the extent permitted by law.


pub  2048R/17DC5B7A 2016-09-02 arvind (arvind gpg test) <arvind@gmail.com>

Delete this key from the keyring? (y/N) y
[oracle@Linux03 ~]$ gpg --list-keys
[oracle@Linux03 ~]$ 

how to generate a new key with gpg encryption


Assuming that you have installed the gpg package on your machine.

[oracle@Linux03 ~]$ gpg --gen-key
gpg (GnuPG) 2.0.14; Copyright (C) 2009 Free Software Foundation, Inc.
This is free software: you are free to change and redistribute it.
There is NO WARRANTY, to the extent permitted by law.

Please select what kind of key you want:
   (1) RSA and RSA (default)
   (2) DSA and Elgamal
   (3) DSA (sign only)
   (4) RSA (sign only)
Your selection? 1
RSA keys may be between 1024 and 4096 bits long.
What keysize do you want? (2048)
Requested keysize is 2048 bits
Please specify how long the key should be valid.
         0 = key does not expire
      <n>  = key expires in n days
      <n>w = key expires in n weeks
      <n>m = key expires in n months
      <n>y = key expires in n years
Key is valid for? (0) 0
Key does not expire at all
Is this correct? (y/N) y

GnuPG needs to construct a user ID to identify your key.

Real name: arvind
Email address: arvind@gmail.com
Comment: arvind gpg test
You selected this USER-ID:
    "arvind (arvind gpg test) <arvind@gmail.com>"

Change (N)ame, (C)omment, (E)mail or (O)kay/(Q)uit? o
You need a Passphrase to protect your secret key.

can't connect to `/home/oracle/.gnupg/S.gpg-agent': No such file or directory

(pinentry-gtk-2:3073): GLib-GObject-CRITICAL **: Object class GtkSecureEntry doesn't implement property 'editing-canceled' from interface 'GtkCellEditable'

(pinentry-gtk-2:3076): GLib-GObject-CRITICAL **: Object class GtkSecureEntry doesn't implement property 'editing-canceled' from interface 'GtkCellEditable'
We need to generate a lot of random bytes. It is a good idea to perform
some other action (type on the keyboard, move the mouse, utilize the
disks) during the prime generation; this gives the random number
generator a better chance to gain enough entropy.
We need to generate a lot of random bytes. It is a good idea to perform
some other action (type on the keyboard, move the mouse, utilize the
disks) during the prime generation; this gives the random number
generator a better chance to gain enough entropy.
gpg: key 17DC5B7A marked as ultimately trusted
public and secret key created and signed.

gpg: checking the trustdb
gpg: 3 marginal(s) needed, 1 complete(s) needed, PGP trust model
gpg: depth: 0  valid:   1  signed:   0  trust: 0-, 0q, 0n, 0m, 0f, 1u
pub   2048R/17DC5B7A 2016-09-02
      Key fingerprint = 7B68 5877 A612 F10A AD43  5E01 2320 7F55 17DC 5B7A
uid                  arvind (arvind gpg test) <arvind@gmail.com>
sub   2048R/5C9DA3C6 2016-09-02


[oracle@Linux03 ~]$ gpg --list-keys
/home/oracle/.gnupg/pubring.gpg
-------------------------------
pub   2048R/17DC5B7A 2016-09-02
uid                  arvind (arvind gpg test) <arvind@gmail.com>
sub   2048R/5C9DA3C6 2016-09-02

[oracle@Linux03 ~]$

Thursday, June 30, 2016

Copy files from linux to windows using PSCP (putty)


This is a  simple batch script that will prompt you for the remote file location and when  provided will copy file from remote location to local destination directory (will prompt for local dir too ).
This script will need putty pscp executable file and you will need to configure the create and save connection to the remote hosts. As below

You can download putty from here


-- Script starts here 
-- copy below to file and save it as batch file Ex:  filename.bat 


@ECHO off

SET /P REMOTE_FILE=ENTER FULL PATH TO REMOTE FILE:
SET /P LOCAL_FOLDER=ENTER PATH TO LOCAL FOLDER:
SET PATH=C:\Program Files (x86)\PuTTY;%PATH%
IF "%REMOTE_FILE%"=="" GOTO Error1
IF "%LOCAL_FOLDER%"=="" GOTO Error2
ECHO EXECUTING :
ECHO pscp username@Linux01:%REMOTE_FILE% %LOCAL_FOLDER%
pscp username@Linux01:%REMOTE_FILE% %LOCAL_FOLDER%
GOTO End
:Error1
ECHO You didn't enter REMOTE_FILE details!!
:Error2
ECHO You didn't enter LOCAL_FOLDER details!!
:End


Sample output :

C:\Windows\System32>pscp_script.bat
ENTER FULL PATH TO REMOTE FILE: /u01/app/oracle/dpump/test1.log
ENTER PATH TO LOCAL FOLDER: C:\test
EXECUTING :
pscp username@Linux01:/u01/app/oracle/dpump/test.log C:\test
test.log                  | 18 kB |  18.5 kB/s | ETA: 00:00:00 | 100%

Wednesday, June 29, 2016

FIREWALL SETTINGS TO ALLOW PORTS ON WINDOWS SERVER


Firewall settings to allow connections via ports for SQL SERVER on WINDOWS SERVER


 Opening up ports will allow the public/private connections to connect to DB via certain ports. This is a security feature that has to be enforced in a real time windows server in a secured environment.

 Goto >> control panel >> system and security


Then goto >> windows firewall and select advanced settings.


You will see inbound & outbound rules. These are the settings that need to be changed in order to allow or block connections.


select inbound rules and edit them. You can specify the ports that you would like to allow for inbound connections. Enter the below ports.


Select Allow the connection


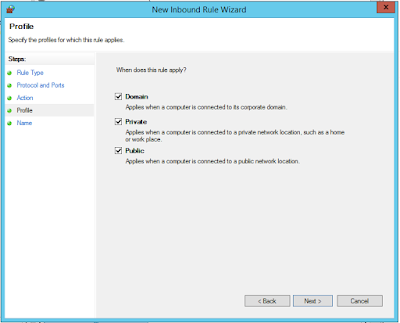
Select types of connections you want to allow


Name the inbound connection rule


 Click on the inbound rules and verify the new rule has been added to list.


Step-by-Step Process of Installing SQL SERVER 2014 on Windows Server

Installation of SQL SERVER 2014 on Windows Server


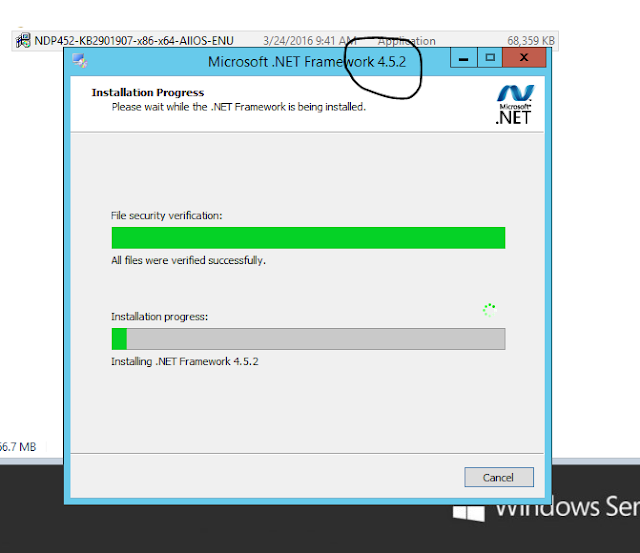
It is a pre-req for SQL SERVER installation to have  have Microsoft .NET Framework 4.5 or higher version installed.


 Invoke sql-server Setup. Make sure you run installer as administrator.


Select the option that you would like to perform. In this case we are installing a new setup.


Then you will prompted for installtion. what type of installation are you trying to perform. Select New SQL SERVER stand alone installation as below screen.


You will be prompted for key. Select Evaluation if you don't have a Key. In my case I have Key so I am entering the key.


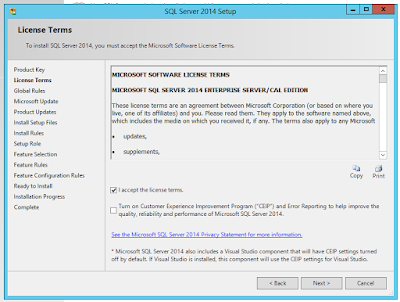
Accept Incensing Terms. If you have a customer support check second box  too..


Check the box if you would like to Microsoft to check for Updates.


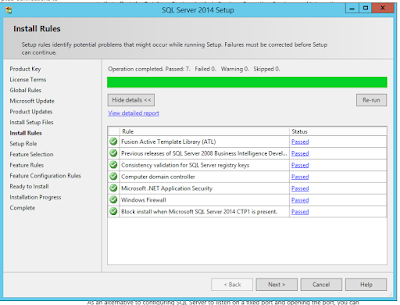
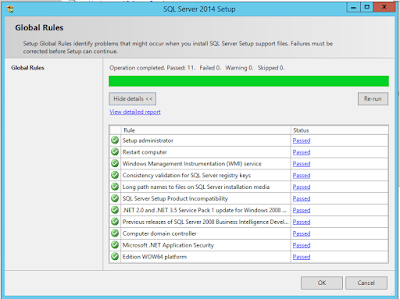
Make sure you do not receive any warning. If you have any warnings, you should clear them before you progress to next step.


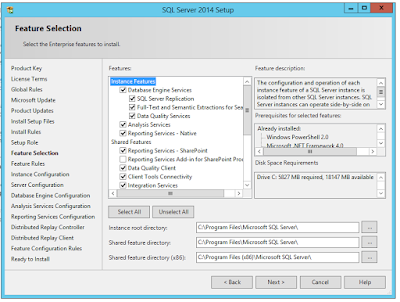
Select the options In my case I am going to install defaults.


In this step you can select the locations of where you want to install the software and also what features you want to include or discard.


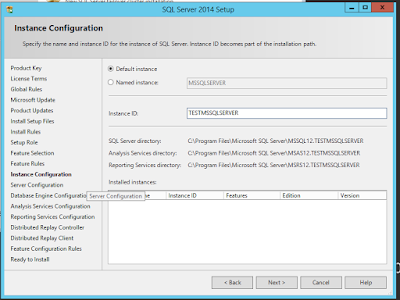
Name the Instance or leave it as default (I suggest to add your own name)


Setup service accounts and passwords. You also have an option to select if these services can start automatically or manually upon srever reboot.


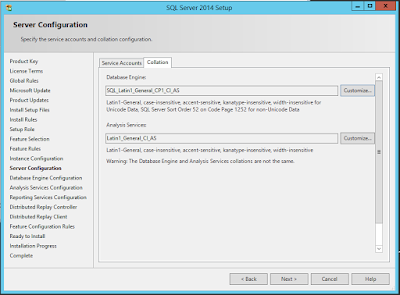
Select Collation  (character set in oracle). leave it default if you are unsure.


Select mode of authentication for you database. use mix mode if you want to connect to DB using password & windows authentication.


select data directories locations 


You can add additional user accounts to connect to DB here.


Install and configure


Check summary :


Connecting to oracle database using MS-DOS cmdline


Connecting to oracle database using MS-DOS cmdline 


set ORACLE_HOME=D:\app\oracle\product\11.2.0\db_1
set ORACLE_SID=ORCL

sqlplus -s "USERNAME/PASSWORD" @C:\Shell\Drop_objs.sql


sqlplus -s "USERNAME/PASSWORD" @C:\Shell\Drop_objs1.sql

-- We can add multiple sql scripts here

Sunday, April 17, 2016

script to check if the file exists

#!/usr/bin/ksh
## This is a simple script to check if the file exists in a dir or not
## Created by : Arvind Reddy
## This will prompt for

echo " file name please : "
read FILENAME;
export dataDir=/u01/app/oracle/dpump;  ## change this to directory you want check the file
sourceFile=SCOTT.dmp;                         ## Filename you want to check for

cd /u01/app/oracle/dpump;
echo `pwd`

##Did we get a file?

if [ -e ${dataDir}/${sourceFile} ];then
echo "Found file !! "
else
echo " No file found !!! "
fi

copying files from host OS to guest OS on Virtual Machine

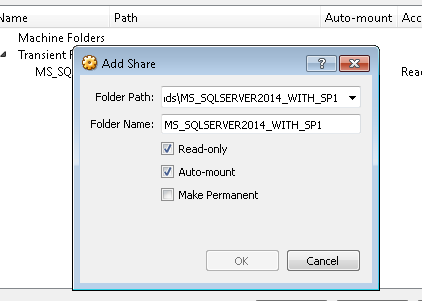
 Configuring file copy from host machine to  Guest OS and from guest OS to host machine in avirtual box environment. This will be helpful when you have some files downloaded on you Host mahine and you want to copy them to Guest OS.

On virtual box Guest OS  click on devices and select shared folder as bellow screen


Then select the folder on your Host machine's directory that you want to share between host 
and guest OS.


Once you have selected the right directory make it read-only if you want to just read files from that directory. Also select auto-mount so you can have this folder always mounted when you restart/start you guest OS.

Friday, April 15, 2016

adding user and groups in Linux

Create the new groups and user .


groupadd ggowner  ## Adding new group ggowner

useradd -g ggowner -G dba,oper gguser ## Adding new user gguser & add to groups default ggowner additional dba,oper,oinstall


WE CAN QUERY THESE NEW USERS IN LINUX:


[root@Linux03 Desktop]# cat /etc/passwd |grep gguser

gguser:x:501:501:golden gate user:/home/gguser:/bin/bash

gguser1:x:502:54331::/home/gguser1:/bin/bash


LOGIN AS NEW USER :


[root@Linux03 Desktop]# su gguser


CHECK THE GROUPS GGUSER IS PART OF :


[gguser@Linux03 Desktop]$ id

uid=501(gguser) gid=501(gguser) groups=501(gguser),54321(oinstall),54322(dba),54330(ggowner) context=unconfined_u:unconfined_r:unconfined_t:s0-s0:c0.c102

Thursday, March 24, 2016

Open Linux ports on firewall


One important firewall setting that every NIX admin should learn is about the ports and firewall security. As these are the heart of any server. An invalid or miss-configuration can lead to many threats to organizations data.

It is a good practice to close enable firewall settings on. Always open only those ports in firewall that are required for access. Close unnecessarily open ports immediately when not needed.

You can only set/see these settings when logged in as root user. Once logged in as root, firewall settings are part of administration under system. Clicking on firewall will give you below screen.


In this below screen i wan to open up port 1521 for my oracle database to be accessed from other machines. Clicking on Other ports >> Add >> user defined.

Will give you ability to allow this port via firewall settings. This is just a high level config. You can also set advanced settings selecting other options but that's out of scope for this tutorial. That's it port 1521 is available for outside world now on your host IP.


Tuesday, March 15, 2016

Uppercase to lowercase or vice versa in BASH

Uppercase to lowercase or vice versa

The bash version 4.x+ got some interesting new features. Type the following commands to convert $VAR into uppercase:


VAR="All THIS will be in UppER Case"
echo "${VAR^^}"

Sample outputs:

ALL THIS WILL BE IN UPPER CASE

Type the following commands to convert $VAR into lowercase:


VAR="All THIS will be in lOWer Case"
echo "${VAR,,}"

Sample outputs:

all this will be in lower case

Script to Check log file for errors and alert

#!/bin/bash
# Purpose: Detecting ORACLE Errors from any log file and send email
# Author: Arvind Toorpu
# Note : The script must run as a cron-job.
# Last updated on : 15-Feb-2016
## edit FILE to log file u want to check for errors
# -----------------------------------------------

# Store path to commands
FILE=/u01/app/oracle/admin/bin/test_error.txt

# Store email settings

AEMAIL="abcd@anyorg.com"
SUBJ="ORACLE Error - $(hostname)"
AMESS="Warning - ORACLE errors found on $(hostname) @ $(date). See log file for the details /u01/app/oracle/admin/bin/test_error.txt"
OK_MESS="OK: NO ORACLE Error Found."
WARN_MESS="ERROR: ORACLE Error Found."


# Check if $FILE exists or not
if test ! -f "$FILE"
then
        echo "Error - $FILE not found or mcelog is not configured for 64 bit Linux systems."
        exit 1
fi

# okay search for errors in file
error_log=$(grep -c -i "ORACLE error" $FILE)

# error found or not?
if [ $error_log -gt 0 ]
then    # yes error(s) found, let send an email
        echo "$AMESS" | mailx -s "$SUBJ" $AEMAIL <<-EOF
### Below line can be removed if you dont want to receive last few lines of that alert log
        `tail -n -50 /u01/app/oracle/admin/bin/test_error.txt`
        EOF
else    # naa, everything looks okay
        echo "$OK_MESS"
fi

change hostname on a linux machine -centos

I want to change my Linux hostname from Linux01 to Linux03

[root@Linux01 Desktop]# vi /etc/sysconfig/network

[root@Linux01 Desktop]# cat /etc/sysconfig/network
NETWORKING=yes
HOSTNAME=Linux03

RESTART THE SERVER NOW. AFTER REBOOT

[oracle@Linux03 Desktop]$ hostname
Linux03

[oracle@Linux03 Desktop]$

Linux os level backup and cleanup cmds

REMOVE ALL FILES OLDER THAN 15 DAYS:

[oracle@Linux01 dpump]$
find /u01/app/oracle/dpump/*.dmp -mtime +15 -exec rm {} \;


GZIP ALL FILES OLDER THAN 15 DAYS: (This will make individual GZIP files)

[oracle@Linux01 dpump]$
find /u01/app/oracle/dpump/*.dmp -mtime +90 -exec gzip {} \;


MOVE FILES OLDER THAN 15DAYS

find /home/arvind -maxdepth 1 -iname "*.txt" -mtime -15 -exec mv {} /home/arvind/test1/ \;


COUNT FILES OLDER THAN 90 DAYS

find /u01/app/oracle/admin/adump/*.aud -mtime +90 | exec wc -l {} \;


TAR ALL FILES OLDER THAN 15 DAYS: 
(This will make 1 TAR FILE With date format at end)

[oracle@Linux01 dpump]$

find /u01/app/oracle/admin/ORCL/adump/*.aud -mtime +90 | xargs  tar -czvPf  /u01/app/oracle/admin/ORCL/adump/ARCH_AUD_$(date +%F).tar.gz

Wednesday, February 24, 2016

EXIT status messages in NIX

Exit Status

By default in Linux if particular command/shell script is executed, it return two type of values which is used to see whether command or shell script executed is successful or not.

(1) If return value is zero (0), command is successful.
(2) If return value is nonzero, command is not successful or some sort of error executing command/shell script.

This value is know as Exit Status.

But how to find out exit status of command or shell script?
Simple, to determine this exit Status you can use $? special variable of shell.

For e.g. If I want to remove a non-existing file

$ rm ABCD
rm: cannot remove `ABCD': No such file or directory
and after that if you give command
$ echo $?
it will print nonzero value to indicate error. Now give command

$ ls
$ echo $?
It will print 0 to indicate command is successful.

Exercise
Try these exit status and check for yourself:

$ expr 1 + 3
$ echo $?

$ echo Welcome
$ echo $?

$ wildwest canwork?
$ echo $?

$ date
$ echo $?

$ echon $?
$ echo $?

Convert all text in a file from UPPER to lowercase on LINUX

Convert all text in a file from UPPER to lowercase

To translate or delete characters use tr command. The basic syntax is:

Lets create a simple text file with mix of lower and upper case chars :
oracle@Linux01:[/u01/app/oracle/admin/bin] $ vi TGTGTG.txt

oracle@Linux01:[/u01/app/oracle/admin/bin] $ cat TGTGTG.txt
as This IS in Upper

Here I am passing the TGTGTG.txt as inprt and converting the output to lower case:
oracle@Linux01:[/u01/app/oracle/admin/bin] $ tr '[:upper:]' '[:lower:]' < TGTGTG.txt > output.txt

oracle@Linux01:[/u01/app/oracle/admin/bin] $ cat output.txt
as this is in upper

Here I am passing the TGTGTG.txt as inprt and converting the output to UPPER case:
oracle@Linux01:[/u01/app/oracle/admin/bin] $ tr '[:lower:]' '[:upper:]' < TGTGTG.txt > output_UP.txt

oracle@Linux01:[/u01/app/oracle/admin/bin] $ cat output_UP.txt
AS THIS IS IN UPPER

oracle@Linux01:[/u01/app/oracle/admin/bin] $

Monday, February 22, 2016

Configure gmail to send emails from your Linux machine

In this how to, I assume you already have a running CentOS 6.7 server. I am going to share how to install and setup ssmtp.x86_64 0:2.61-22.el5 on CentOS 6.7 version. This how to has been tested with mutt-1.5.20-7 as a mail client.

First, we must ensure everything are up to date by running the following commands: –

[root@Linux01 Desktop]# wget -c http://dl.fedoraproject.org/pub/epel/5/x86_64/epel-release-5-4.noarch.rpm

Resolving dl.fedoraproject.org... 209.132.181.26, 209.132.181.25, 209.132.181.23, ...
Connecting to dl.fedoraproject.org|209.132.181.26|:80... connected.
HTTP request sent, awaiting response... 200 OK
Length: 12232 (12K) [application/x-rpm]
Saving to: “epel-release-5-4.noarch.rpm”

100%[==================================================================================================================>] 12,232      --.-K/s   in 0s    

2016-02-22 09:50:52 (93.2 MB/s) - “epel-release-5-4.noarch.rpm” saved [12232/12232]

[root@Linux01 Desktop]# rpm -ivh epel-release-5-4.noarch.rpm
Preparing...                ########################################### [100%]
   1:epel-release           ########################################### [100%]
[root@Linux01 Desktop]# yum -y install ssmtp
Loaded plugins: fastestmirror, refresh-packagekit, security
Setting up Install Process
Loading mirror speeds from cached hostfile
 * base: mirror-centos.hostingswift.com
 * epel: archive.linux.duke.edu
 * extras: mirror.sesp.northwestern.edu
 * updates: mirror-centos.hostingswift.com
base                                                                                                                                 | 3.7 kB     00:00    
epel                                                                                                                                 | 3.6 kB     00:00    
epel/primary_db                                                                                                                      | 2.9 MB     00:01    
extras                                                                                                                               | 3.4 kB     00:00    
updates                                                                                                                              | 3.4 kB     00:00    
updates/primary_db                                                                                                                   | 3.9 MB     00:03    
Resolving Dependencies
--> Running transaction check
---> Package ssmtp.x86_64 0:2.61-22.el5 will be installed
--> Finished Dependency Resolution

Dependencies Resolved

============================================================================================================================================================
 Package                            Arch                                Version                                     Repository                         Size
============================================================================================================================================================
Installing:
 ssmtp                              x86_64                              2.61-22.el5                                 epel                               55 k

Transaction Summary
============================================================================================================================================================
Install       1 Package(s)

Total download size: 55 k
Installed size: 93 k
Downloading Packages:
:
:
:
:                                                                                                             1/1

Installed:
  ssmtp.x86_64 0:2.61-22.el5                                                                                                                              

Complete!

[root@Linux01 Desktop]# help sendmail
bash: help: no help topics match `sendmail'.  Try `help help' or `man -k sendmail' or `info sendmail'.
[root@Linux01 Desktop]# man -k sendmail
sendmail             (1)  - Postfix to Sendmail compatibility interface
sendmail             (8)  - Postfix to Sendmail compatibility interface


[root@Linux01 Desktop]# cd /etc/ssmtp
[root@Linux01 ssmtp]# ls -ll
total 8
-rw-r--r--. 1 root root  200 Apr 16  2001 revaliases
-rw-r-----. 1 root mail 1371 Jan 12  2015 ssmtp.conf
[root@Linux01 ssmtp]# mv /etc/ssmtp/ssmtp.conf /etc/ssmtp/ssmtp.conf.ori
[root@Linux01 ssmtp]# touch /etc/ssmtp/ssmtp.conf
[root@Linux01 ssmtp]# mv /etc/ssmtp/revaliases /etc/ssmtp/revaliases.orig
[root@Linux01 ssmtp]# touch /etc/ssmtp/revaliases
[root@Linux01 ssmtp]# vi /etc/ssmtp/ssmtp.conf
[root@Linux01 ssmtp]# vi /etc/ssmtp/revaliases

Next, we will configure sSMTP to forward email to any shared hosting server either running CPanel or DirectAdmin.

Include the following below in /etc/ssmtp/ssmtp.conf file: –

root=postmaster
mailhub=mail.yourdomain.com:587
Hostname=localhost
FromLineOverride=YES
AuthUser=abcd@yourdomain.com
AuthPass=YourPassWord
UseSTARTTLS=YES

Include the following below in /etc/ssmtp/revaliases file: –

root:username@yourdomain.com:mail.yourdomain.com:587

Include the following below in /root/.muttrc file: –

set envelope_from=yes
set from="username@yourdomain.com"
set realname="Prefer From Display"

You can use GMAIL server to forward your mails. Use below seetings to configure the GMAIL SMTP

If you an option to forward email to Gmail server, you can configure using steps below.

Replace previous configuration to below in /etc/ssmtp/ssmtp.conf file: –

root=postmaster
mailhub=smtp.gmail.com:587
Hostname=abcd@gmail.com
FromLineOverride=YES
AuthUser=abcd@gmail.com
AuthPass=YourPassWord
UseSTARTTLS=YES

Replace previous configuration to below in /etc/ssmtp/revaliases file: –

root:username@gmail.com:smtp.gmail.com:587

Replace previous configuration to below in /root/.muttrc file: –

set envelope_from=yes
set from="abcd@gmail.com"
set realname="Prefer From Display"

Next, you can start sending email using your preferred email server using command below: –

[root@Linux01 ~]# echo "Testing outgoing email" | mutt -s "Testing" arvind.toorpu@nelnet.net
bash: mutt: command not found
[root@Linux01 ~]# yum install mutt
Loaded plugins: fastestmirror, refresh-packagekit, security
Setting up Install Process
Loading mirror speeds from cached hostfile
 * base: mirror-centos.hostingswift.com
 * epel: mirror.steadfast.net
 * extras: mirror.sesp.northwestern.edu
 * updates: mirror-centos.hostingswift.com
Resolving Dependencies
--> Running transaction check
---> Package mutt.x86_64 5:1.5.20-7.20091214hg736b6a.el6 will be installed
--> Processing Dependency: urlview for package: 5:mutt-1.5.20-7.20091214hg736b6a.el6.x86_64
--> Processing Dependency: libtokyocabinet.so.8()(64bit) for package: 5:mutt-1.5.20-7.20091214hg736b6a.el6.x86_64
--> Running transaction check
---> Package tokyocabinet.x86_64 0:1.4.33-6.el6 will be installed
---> Package urlview.x86_64 0:0.9-7.el6 will be installed
--> Finished Dependency Resolution

Dependencies Resolved

============================================================================================================================================================
 Package                             Arch                          Version                                                Repository                   Size
============================================================================================================================================================
Installing:
 mutt                                x86_64                        5:1.5.20-7.20091214hg736b6a.el6                        base                        1.2 M
Installing for dependencies:
 tokyocabinet                        x86_64                        1.4.33-6.el6                                           base                        428 k
 urlview                             x86_64                        0.9-7.el6                                              base                         24 k

Transaction Summary
============================================================================================================================================================
Install       3 Package(s)

Total download size: 1.7 M
Installed size: 5.6 M
Is this ok [y/N]: y
Downloading Packages:
(1/3): mutt-1.5.20-7.20091214hg736b6a.el6.x86_64.rpm                                                                                 | 1.2 MB     00:00    
(2/3): tokyocabinet-1.4.33-6.el6.x86_64.rpm                                                                                          | 428 kB     00:00    
(3/3): urlview-0.9-7.el6.x86_64.rpm                                                                                                  |  24 kB     00:00    
------------------------------------------------------------------------------------------------------------------------------------------------------------
Total                                                                                                                       1.5 MB/s | 1.7 MB     00:01    
Running rpm_check_debug
Running Transaction Test
Transaction Test Succeeded
Running Transaction
  Installing : tokyocabinet-1.4.33-6.el6.x86_64                                                                                                         1/3
  Installing : urlview-0.9-7.el6.x86_64                                                                                                                 2/3
  Installing : 5:mutt-1.5.20-7.20091214hg736b6a.el6.x86_64                                                                                              3/3
  Verifying  : 5:mutt-1.5.20-7.20091214hg736b6a.el6.x86_64                                                                                              1/3
  Verifying  : urlview-0.9-7.el6.x86_64                                                                                                                 2/3
  Verifying  : tokyocabinet-1.4.33-6.el6.x86_64                                                                                                         3/3

Installed:
  mutt.x86_64 5:1.5.20-7.20091214hg736b6a.el6                                                                                                              

Dependency Installed:
  tokyocabinet.x86_64 0:1.4.33-6.el6                                               urlview.x86_64 0:0.9-7.el6                                            

Complete!
[root@Linux01 ~]# vi /root/.muttrc
[root@Linux01 ~]# clear

[root@Linux01 ~]# echo "Testing outgoing email" | mutt -s "Testing" abcd@gmail.com
[root@Linux01 ~]# clear


Finally, with all the configuration above I hope you are able to use and enjoy your sSMTP to send an email. Thank you.